|
P2V, physical disks and vmware-vdiskmanager
vmware-vdiskmanager is very useful if the P2V candidate lives in a
physical disk
that can be temporarily used with a system that has VMware Workstation
installed.
It can also be directly used on the source machine if a MOA LiveCD
with Workstation is available.
The disk in question can be one of the local ones or a device connected
via USB-disk, USB-stick or iSCSI.
It does not matter which filesystems are used on the disk and it also
does not matter if any driveletters or
mountpoints are assigned.
Only condition: the disk must appear in diskmanagement .
There may be faster ways to do the imaging part of a P2V task ...
but vdiskmanager has a few advantages :
- it can be scripted
- it gives full control of the output format
- it can be used with unknown filesystems
- it can store the result anywhere
- it is reliable and displays progress
vmware-vdiskmanager comes with VMware Workstation and so it can be
used with regular Windows or Linuxsystems
and with Windows and Linux LiveCDs.
WARNING:
the advanced example is really advanced - you can easily waste your
time and produce unusable results.
Don't blame me - practice before you use this in production
Ulli Hankeln
create the vmdk descriptor ...
To make vdiskmanager handle physical real disks we must write a vmdk
description for it.
This description can include the whole disk in one piece - in this
case the vmdk-type is called "fullDevice"
Or it can list all partitions and allow to mask single partitions
- then the vmdk-type is called "partitionedDevice"
In practical terms ... a disk like this

can be described in one piece like here
# Disk DescriptorFile --- filename = physical.vmdk
version=1
encoding="windows-1252"
CID=fffffffe
parentCID=ffffffff
isNativeSnapshot="no"
createType="fullDevice"
# Extent description
RW 72303840 FLAT "\\.\PhysicalDrive0" 0
# The Disk Data Base
#DDB
ddb.virtualHWVersion = "7"
ddb.longContentID = "e5542cfecc0b26a44cd9a694fffffffe"
ddb.uuid = "60 00 C2 9a 05 ea ac 1a-bc b6 74 0e 0b 86 f2 d2"
ddb.geometry.cylinders = "16383"
ddb.geometry.heads = "16"
ddb.geometry.sectors = "63"
ddb.geometry.biosCylinders = "1024"
ddb.geometry.biosHeads = "255"
ddb.geometry.biosSectors = "63"
ddb.adapterType = "ide"
or as a detailed partition list like here
# Disk DescriptorFile
version=1
encoding="windows-1252"
CID=fffffffe
parentCID=ffffffff
isNativeSnapshot="no"
createType="partitionedDevice"
# Extent description
RW 63 FLAT "physical-1-pt.vmdk" 0
RW 16386237 FLAT "\\.\PhysicalDrive0" 63
RW 16386300 ZERO
RW 16386300 FLAT "\\.\PhysicalDrive0" 32772600
RW 23133600 ZERO
RW 11340 ZERO
# The Disk Data Base
#DDB
ddb.virtualHWVersion = "7"
ddb.longContentID = "c8a3ab297773bb0924886a33fffffffe"
ddb.uuid = "60 00 C2 97 6f b9 5d 49-ae 69 97 ef da f6 b8 4b"
ddb.geometry.cylinders = "16383"
ddb.geometry.heads = "16"
ddb.geometry.sectors = "63"
ddb.geometry.biosCylinders = "1024"
ddb.geometry.biosHeads = "255"
ddb.geometry.biosSectors = "63"
ddb.adapterType = "ide"
In the Add Hardware wizard of Workstation you select the disk number
and vmdk-type with this switch
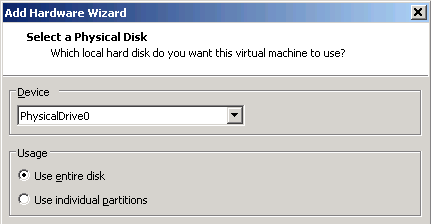
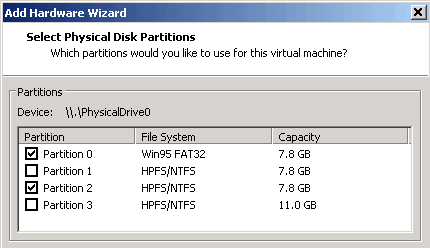
If you pick the type "partionedDevice" you can select the
partitions to copy here
Either way store the descriptor-file as "physical.vmdk"
top
usage ....
Now that we have a vmdk-file we can use vdiskmanager against it.
The interesting option is -r.
This converts a source-vmdk into a target-vmdk.
During conversion the vmdk-type can be changed and the result can
be stored locally or directly on a ESX.
Easy example first ...
vmware-vdiskmanager -r "physical.vmdk" -t 1
"U:\target.vmdk"
This converts the physical disk and stores it as growing split format
on a USB-disk temporarily mounted as U:\
If the format -t 1 is used even large vmdks can be stored on Fat32
drives for later transport for example.
In this mode the conversion is pretty fast ...
A more sophisticated example ....
echo myrootpassword > passwordfile
vmware-vdiskmanager.exe -r physical.vmdk -t 6 -h esxi.sanbarrow.local
-u root -f passwordfile
"[datastore1000]/import/target.vmdk"
del passwordfile
del physical.vmdk
The arguments (all in one line) in details:
-r = "convert" option
physical.vmdk = path to the source.vmdk
-t 6 = create a thin disk on ESX
-h esxi.sanbarrow.local = the hostname of
the ESXi - the IP address should work as well
-u root = the user name
-f passwordfile = specify the name of a file
with the root password in it - the echo command creates this file
"[datastore1000]/import/targetDisk.vmdk"
= give the full path of the new vmdk
This converts the physical disk and stores it directly on ESXi in
thin provisioned format.
To talk with the ESXi we need the password in a file we can create
with a simple echo command.
top
specify the output format ....
The target.vmdk can have various output-formats that you specify
by the -t option.
| 0 |
single growable virtual disk |
monolithicSparse |
| 1 |
growable virtual disk split in 2GB files |
twoGbMaxExtentSparse |
| 2 |
preallocated virtual disk |
monolithicFlat |
| 3 |
preallocated virtual disk split in 2GB files
|
twoGbMaxExtentFlat |
| 4 |
preallocated ESX-type virtual disk |
VMFS thick provisioned |
| 5 |
compressed disk optimized for streaming
|
|
| 6 |
thin provisioned virtual disk - ESX 3.x and above
|
VMFS thin provisioned |
top
advanced usage ...
Experienced users can manipulate the "physical.vmdk" before
converting it with vdiskmanager.
It is easy to produce unusable vmdks when doing
so - so take care
Try easy examples first before you start a partition dance
and cut the original disk in slices and reassemble them at will.
Here is a moderate example of such an edit - in fact a pretty easy
one. See yourself
# Disk DescriptorFile
version=1
encoding="windows-1252"
CID=fffffffe
parentCID=ffffffff
isNativeSnapshot="no"
createType="fullDevice"
# Extent description
RW 17000000 FLAT "\\.\PhysicalDrive0" 0
# The Disk Data Base
#DDB
ddb.virtualHWVersion = "7"
ddb.longContentID = "e5542cfecc0b26a44cd9a694fffffffe"
ddb.uuid = "60 00 C2 9a 05 ea ac 1a-bc b6 74 0e 0b 86 f2 d2"
ddb.geometry.cylinders = "16383"
ddb.geometry.heads = "16"
ddb.geometry.sectors = "63"
ddb.geometry.biosCylinders = "1024"
ddb.geometry.biosHeads = "255"
ddb.geometry.biosSectors = "63"
ddb.adapterType = "ide"
In the original first "fullDevice" description of the example
disk we copied to complete disk.
In this example we just copy slightly more then the first partition.
If you do this kind of edits be prepared to fix the MBR and rewrite
the disk-geometry.
If you need help feel free to ask at the sanbarrow forum
top
|
